Quick & Easy Cashew Chicken

This cashew chicken is, dare I say it, better than take-out.  Made with simple, easily-accessible ingredients and ready in minutes, it’s great for a weeknight or a special meal.  If you love cashews, like I do, you will love this easy take-out fake-out.  ~Erin

1 ½ lb. chicken breast, trimmed and cut into 1-inch pieces

½ tsp. Salt

½ tsp. Black pepper

3 T. cornstarch

2 Tablespoon olive or avocado oil

¼ c. low-sodium soy sauce

½ cup chicken broth or prepared bullion

4 cloves garlic, minced (about 2 Tablespoons)

2 T. brown sugar, packed

2 T. hoisin sauce

1 tsp. Sesame oil

1 c. roasted, salted cashews

Green onions, sliced

Cooked rice for serving

Combine salt, pepper, and cornstarch in a gallon size baggie. Toss the chicken in the cornstarch mixture until evenly coated.

In a small bowl, whisk together the soy sauce, chicken broth, garlic, brown sugar, hoisin sauce, and sesame oil; set aside.

Add olive oil or avocado oil to a large, high sided nonstick skillet over medium-high heat.  When the oil is hot, cook the chicken until golden brown on all sides.  Do not overcook.  It will continue cooking when the sauce is added.

Add the sauce to the pan with the chicken.  Add the cashews.  Stir until the sauce is thickened.  This just takes a couple minutes.  

Garnish with sliced green onions. Serve over rice.

This recipe makes 6 – ¾ c. servings.  9-11 points per serving, not counting rice.  Click here for the WW points calculator.

https://cmx.weightwatchers.com/details/MEMBERRECIPE:62918d19d8d71c1b1ebc1c56

Orange Ginger Beef

As a teacher and busy mom, I don’t have time to cook all evening.  There are papers to grade and kids who need help with homework.  So, now that school has started back, I’m all about meals I can prepare in a short period of time.  This Orange Beef is one of my favorite week-night meals.  It can be on the table in less than 30 minutes… really more like 15, including the time it takes to slice the steak.  Plus, the Asian flavors hit the spot on a night I’m tempted to pick up Chinese take-out on the way home from work.  Fake-out take-out at its best!  ~Erin

20190901_221618.jpg

  • 1 lb. New York strip steaks, trimmed and cut into small strips
  • 3 thinly sliced scallions
  • 2 tsp. ginger paste
  • Zest of half a navel orange
  • ½ tsp. salt
  • ½ tsp. pepper
  • ½ T. canola or vegetable oil
  • ½ T. sesame oil
  • 2 T. packed brown sugar
  • 1 tsp. corn starch
  • 2 T. water
  • ¼ c. fresh squeezed orange juice
  • 1 T. unfiltered apple cider vinegar
  • 2 T. low-sodium soy sauce
  • Optional: crushed red pepper flakes, additional sliced scallions; for garnish
  • Prepared rice or cauliflower rice*, for serving

In a medium bowl, mix beef strips with thinly sliced scallions, ginger paste, orange zest, and salt and pepper until evenly coated.

Heat canola and sesame oil together in a large skillet over medium high heat.

When the skillet is very hot, add the beef and cook for about 5 minutes, turning occasionally.

In a small bowl, whisk together the brown sugar with the corn starch.  Once combined, whisk in the water, fresh-squeezed orange juice, apple cider vinegar, and soy sauce.

Add the mixture to the skillet with the beef; simmer on medium high until thickened, 2-3 minutes, stirring occasionally.

Serve over rice or cauliflower rice; garnish with crushed red pepper flakes and sliced scallions, if desired.

*I find cauliflower rice to have the best flavor when sautéed in a nonstick skillet, using a few sprays of nonstick cooking spray.  Keep the lid on until it thaws, if using frozen.

WW Freestyle Info.:  This recipe makes 4 servings.  Each serving is 10 SmartPoints, not including rice.

This fake-out take-out Orange Ginger Beef is ready in minutes.  10 SmartPoints on WW Freestyle.

Spicy Asian Chicken Meatballs with Broccoli

Confession…I did not grow up an adventurous eater. I was sort of a poster child for, “I won’t eat this, or I’m going to pick that out.” I’m pretty sure I never ate in an Asian restaurant until after I was married. As an adult though, I realized that if I was going to have anything remotely close to a healthy diet, I was going to have to branch out beyond my favorite comfort foods. Confession number two….I’m still not all that adventurous, but I’ve learned to introduce myself, and my kids, to different flavors and foods. I’ve learned that there are better sauces than barbecue or ranch, and that fruits and vegetables can add beautiful flavor and color to our plates. Don’t get me wrong – I still load up my plate with macaroni and cheese on occasion (try ours here), but more often than not, we’re eating something like these Spicy Asian Chicken Meatballs with Broccoli. I think you’ll like it just as much as that take-out comfort food! ~Tracy

C75BD7EA-D3E9-4409-B4D1-FE64F5580CA0

Ingredients for meatballs

  • 1 ¼ lb. ground white meat chicken
  • 1 egg
  • ¼ c. bread crumbs.
  • 3 cloves garlic, minced
  • 1 T. crushed red pepper flakes
  • 1 T. fresh peeled ginger, grated
  • 1 tsp. onion powder
  • 1 tsp. salt
  • ½ tsp. black pepper

Ingredients for sauce

  • ¼ c. teriyaki sauce
  • ½ c. water
  • 1 T. fresh peeled ginger, grated
  • 2 cloves garlic, minced
  • 2 tsp. crushed red pepper flakes
  • ¼ c. lightly packed brown sugar
  • Pinch salt
  • 2 c. steamed broccoli (reserved until adding sauce to meatballs)

Mix all meatball ingredients until well combined. Use a small ice cream scoop to form 24 meatballs.

Place meatballs on large baking sheet, lined with parchment.

Bake at 350, for approximately 25 minutes, or until each meatball begins to turn golden and all juices are clear.

While meatballs are cooking, combine all sauce ingredients (except broccoli) in a small saucepan and whisk together. Heat to a low boil, reduce heat and simmer for two minutes.

Place cooked meatballs and steamed broccoli in a large metal or glass bowl. Cover with sauce and toss together.

This recipe makes 6 servings (4 meatballs per serving). Each serving is 3 WW Freestyle Points.

Serve over rice, but remember to figure WW points on rice separately if desired.

Beef Stir Fry

Occasionally, I find myself in a bit of a cooking rut.  When I realize we’ve had some sort of taco five of the last ten days, it’s time to get a little more creative.  My husband had been craving Asian food recently, and since we have reached the ripe old age of “don’t want to go anywhere unless we have to,” I decided I’d get a little more adventurous with our dinner.  I’ve made this Beef Stir Fry a few times now and it is really is fool-proof! It turns out great every time and you can adapt the veggies to whatever you happen to like best (if there are no teenagers eating with us, I always add extra broccoli).  The ingredients are easy to find, and if you’re lucky enough to have grocery delivery or pick up where you live, you can feel like you’ve had a dinner at a trendy Asian restaurant, without ever having to get out of your pajamas (#goals). ~Tracy

Ingredients:
  • ½ of a yellow onion, thinly sliced
  • ¼ of a large green bell pepper, thinly sliced
  • ¼ of a large red bell pepper, thinly sliced
  • ¼ of a large yellow bell pepper, thinly sliced
  • 1 package frozen broccoli florets (I use 10.8 oz. of Birds Eye Steamfresh)
  • 1 ½ lb thinly sliced Sirloin steak
  • 2 large cloves garlic, minced
  • 2 t. minced or grated fresh ginger
  • ¼ c. + 1 T. lower sodium soy sauce
  • 2 tsp. Sugar
  • 1 ½ T. corn starch
  • 2 tsp. red pepper flakes (use less if you don’t like a little spice)
  • brown or white rice for serving with the stir fry

Instructions: 

  1. In a small bowl, mix the soy sauce, sugar, corn starch, and red pepper flakes. Set aside.
  2. Lightly salt and pepper the steak. Set aside.
  3. Generously spray a large, deep skillet with nonstick canola oil spray.
  4. Saute onion, peppers, and broccoli for several minutes on medium heat until veggies begin to soften. I sometimes throw in an ice cube with the veggies so that the melting ice provides a little steam to assist in their cooking.
  5. Remove the veggies from the pan and set aside while you cook the meat.
  6. Add the steak, garlic, ginger, and soy sauce mixture to the skillet.
  7. Saute over medium heat for approximately 5 minutes. Sauce will bubble and begin to thicken.
  8. When the meat is almost done, add the vegetables back to the pan so that the meat and vegetables can finish cooking together. Cover the skillet with a glass lid.
  9. The final cooking stage will take approximately 5 more minutes, but check the meat and vegetables frequently.
  10. Vegetables should be fork tender and meat should be cooked through when done.
  11. Serve the stir fry over your favorite brown or white rice, if desired.

WW Freestyle Info.: This recipe makes 5 generous 1-cup servings. Each serving is 6 points. Be sure to add points if you serve the stir fry over rice.


Mongolian Beef

I’m like many of you, always looking for ideas to mix up our dinner routine. I love Asian inspired foods, and this is a hit at our house. A little smoky and a titch spicy, it’s the perfect recipe for all the picky eaters around here! ~Kathy

MongolianBeef_logo

Ingredients:
  • 1 T. cornstarch
  • ¾ c. reduced sodium chicken broth
  • 2 T. reduced sodium soy sauce
  • 1 heaping T. hoisin sauce (which ever brand you love as they vary a bit)
  • 1 dash liquid smoke
  • ½ to 1 tsp. red pepper flakes, optional
  • 3-4 cloves of garlic, finely minced
  • ½ tsp. garlic salt
  • 1 tsp. sesame oil
  • 1 lb. boneless top sirloin steak, cut into thin strips
  • 1 ½ tsp. olive oil
  • 8 green onions
  • 3 c. hot cooked rice (just cook using instructions on box)

Instructions: 

  1. Begin cooking rice; follow instructions on your box.
  2. In a small bowl, combine broth and cornstarch until smooth. Stir in the soy sauce, hoisin sauce, liquid smoke, pepper, garlic, garlic salt, and sesame oil; set aside.
  3. In a large nonstick skillet, stir fry beef in 1 ½ teaspoons olive oil until no longer pink. Remove from pan and keep warm.
  4. In the same skillet, stir fry the onions to crisp tender in remaining olive oil. Stir the cornstarch mixture gently then add to the pan. Bring mixture to a boil over medium high heat, stirring for 2 minutes, or until thickened.
  5. Reduce the heat, add beef and heat through. Serve over rice with additional soy sauce, if desired.
  6. Garnish with fresh, thinly sliced green onions.

WW Freestyle Info.: Makes 4 three-ounce servings of beef mixture at 5 points each. (Point total does not include rice, so that you can adjust for the type and quantity of rice you prefer.)

Thai-Style Peanut Chicken Wraps

I love Thai food; peanut sauce is one of my favorite flavors. I mixed this Thai-style sauce up at home for a lighter version of the restaurant favorite. Served in a wrap with a slaw blend and grilled chicken, this makes a great lunch or summer supper! ~Erin

20180415_172610.jpg

First, mix the lime juice, honey, powdered peanut butter, soy sauce, ginger & sriracha in a small bowl.

Arrange each wrap with ½ of a sliced grilled chicken breast and about ½ a cup of slaw blend. This is the slaw mix I use but any broccoli slaw will work.

20180415_165110.jpg

Drizzle each with 1 T. peanut sauce and top with 5 grams (about a teaspoon) of chopped peanuts.

Wrap it up and enjoy!

Sweet & Spicy Chicken Stir-Fry

My daughter turns 11 this week. She’s just like I was as a kid in that she starts planning her next birthday celebration the minute her previous birthday ends. I have to put the kibosh on some of her wild hair ideas but I try to always allow one or two. This year we are taking her and a few of her friends to the zoo and she wants to go dressed as unicorns. Yes, unicorns. I ordered unicorn horns as party favors and she’s created unicorn shirts, complete with rainbow colored tails attached. Good thing she’s crafty.

She also wants a 3 layer cookie cake. Not a plain cookie cake. A sugar cookie cake with 3 layers, frosting between, and sprinkles. It’s a little unexpected (as usual) but honestly it sounds divine so, challenge accepted. (I’m sure you’ll be seeing that soft sugar cookie recipe here on the blog soon. I got it from Kathy and it’s THE BEST. Keep your eyes open for it.)

She also requested this Sweet & Spicy Chicken Stir-Fry for her birthday. Just kidding, that’s a lie. Hahaha, she’s 11, she wants pizza. Surprisingly though, as my more picky child, she actually will eat this stir fry. I know that doesn’t sound like a glowing recommendation but I promise it is. She usually turns up her nose at vegetables mixed in with meat. Not this one. She mostly eats the broccoli and chicken out, but I ain’t complaining if she eats it at all! My son likes it but he eats like a grown up. Anybody else out there have a picky eater? (All the moms raise their hands.) There’s one in every family.

This stir fry is one of our mom’s creations. Mom has always liked to create new recipes, and this is one she came up with not long ago and shared with us at one of our visits to her house. I immediately asked for the recipe. Thanks, Momma! It’s made with basic ingredients but is packed with flavor… spicy without being hot, and has a hint of salty sweetness as well. What can I say, our mom knows how to cook! ~Erin

StirFryLogo

Ingredients:

  • 8 T. red pepper jelly (found in the jelly isle)
  • 4 T. Reduced Sodium Soy Sauce
  • ½ tsp. ginger paste or freshly grated ginger
  • 1 ½ pounds boneless, skinless chicken breasts, cut into small pieces
  • Seasoning of your choice for chicken (I used a prepackaged Asian seasoning but salt, pepper, and garlic powder would be fine too.)
  • 1 large white or yellow onion, thinly sliced
  • 1 T. garlic, minced or pressed (I use pre-minced jarred garlic)
  • 1 yellow, 1 orange, 1 red, and 1 green bell pepper, deseeded sliced into strips
  • 2 small heads of broccoli (about 3 cups), cut into small florets; discard stems
  • 2 ½ T. sesame oil or olive oil, divided
  • Prepared rice, red pepper flakes, chopped green onions, and/or more soy sauce for serving (optional)

Instructions:

  1. In a small bowl, whisk together red pepper jelly, soy sauce, and ginger; set aside.
  2. In a large skillet or wok, heat 1 T. oil over medium high heat. Cook the seasoned chicken a few minutes on each side, until lightly browned and cooked through; remove from pan and set aside.
  3. In the same skillet, heat 1 T. oil over medium-low heat. Add onion and cook until onions are tender and becoming translucent (about 5-6 minutes, stirring often).
  4. Increase heat to medium and add ½ T. more oil. Add all the bell peppers and cook until they start to get tender.
  5. Add the broccoli and cook for 3-4 minutes, until tender but not overly soft.
  6. Add the cooked chicken & sauce to the pan with the veggies; cook & stir until evenly coated & heated throughout.
  7. Serve over rice with more soy sauce if desired.

WW Freestyle Info.:  This recipe makes 8 servings. Each 1 ½ cups serving is 4 points, not including rice.

20170730_203629.jpg

Chicken Chow Mein Spaghetti Squash

ChowMein_logo

So, Friday is my birthday.  It’s also my mom’s birthday.  Yep, I was born on her birthday (just barely – at 11:55 p.m.).  Hours and hours of labor with no drugs.  Happy birthday, Momma…you’re welcome!

Photo452

Mom always said I was the best birthday present she ever received.  She’s a sweet momma.  And I always loved sharing my birthday with her (still do).  It helped that she always let me have all the glory.  She’d cook my favorite meal and bake whatever flavor cake I wanted.  I’d always have all this planned out well in advance because I ALWAYS planned my birthday well in advance… like 6 months in advance.  That’s how much I love my birthday.  As an adult, I started celebrating my birthday ALL WEEK…because why not?  I did this until I had kids and then I had to give up my birthday week because… kids.  I still like to treat myself as much as possible all week though.  If nothing else, I make my favorite meals.  It’s my birthday week.  “I don’t care if you want hamburgers; I get to pick, kid!”  🙂  So this week I’ll be making one of my favorite healthy dinners:  Chicken Chow Mein Spaghetti Squash.

This recipe has a similar flavor profile as our most popular recipe to date, Egg Roll in a Bowl.  It is a bit more time consuming, since you have to roast the spaghetti squash, but that can be done in advance.  In fact, the chicken can be cooked in advance and the sauce mixed up too!  Combining them all at the end takes almost no time at all.  It’s worth the work because it makes a ton (Hooray for leftovers!) and the serving sizes are huge.  You can eat a whole plate full for very few calories/SmartPoints.  And it tastes amazing!  You don’t even notice that it’s spaghetti squash.  I don’t say that lightly because, normally, I believe there’s no substitute for real pasta.  However, in this recipe, it totally works.  And did I mention the serving sizes are huge?  Size matters.  ~Erin

Ingredients:

  • 1 large spaghetti squash (mine was almost 4 pounds raw and made about 5 cups of “spaghetti”)
  • Non-stick cooking spray – I prefer olive oil spray
  • 1 ½ lbs. boneless, skinless chicken thighs, trimmed of fat & cut into bite size pieces
  • 1 tsp. salt
  • ½ tsp. pepper
  • 1 T. garlic powder
  • 3 tsp. sesame oil or extra virgin olive oil, divided
  • 1/3 c. to ½ c. low sodium soy sauce (I use ½ cup.)
  • 1 tsp. ginger paste or freshly grated ginger
  • 3 or 4 cloves garlic, minced or pressed
  • ½ a large onion, diced
  • 3 stalks celery, diced small
  • 1 (16 oz.) bag tri-color coleslaw mix (shredded cabbage with carrots)
  • Optional garnishes:  chopped green onions, sriracha sauce, or red pepper flakes

Instructions:

Preheat oven to 460°F.

Line a baking pan with foil and spray the foil with non-stick cooking spray; set aside.

Cut the spaghetti squash, length-wise, and scoop out the seeds.

Place the squash cut side up in the pan and spray the squash with cooking spray.  Bake in the pre-heated oven for 40 minutes.  (If you have a smaller squash, check it earlier.)

Remove the squash from the oven; using large tongs or oven mitts, carefully flip the squash over, cut side down, and bake for 5 to 10 more minutes.

Remove the squash from the oven and allow to cool completely.  Scoop the strands & set aside.  The spaghetti squashed can be cooked in advance and stored in the refrigerator until ready to use.

In a small bowl, whisk together soy sauce, ginger, and minced/pressed garlic cloves; set aside.

Heat 1 tsp. of oil in a large, high-sided skillet, pot, or Dutch oven on the stove over medium-high heat.

Sprinkle the chicken pieces with salt, pepper, & garlic powder.  Add the chicken to the pan and allow to brown.  Flip and brown the other side.  Remove chicken from the skillet & set aside.

Reduce heat to medium-low and add 1 tsp. of oil, then celery and onion.  Continue to cook, stirring often, until onions are translucent, about 5 minutes.

Add the last 1 tsp. of oil and the entire bag of cole slaw mix to the pan.  Stir until the cabbage begins to wilt, about 3 or 4 minutes.

Add chicken, spaghetti squash, and sauce to the cabbage mixture.  Stir until heated through.

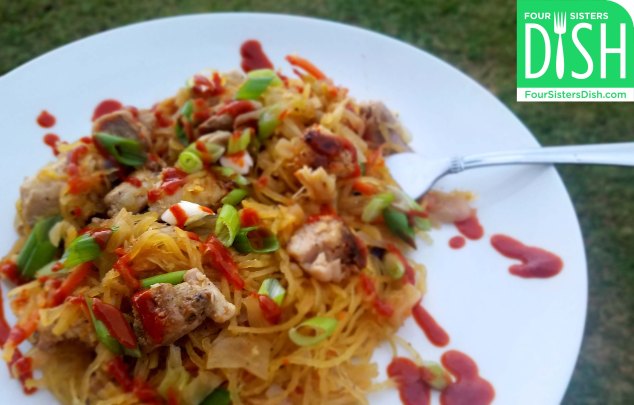
Garnish with chopped green onions and, if desired, sriracha or red pepper flakes.  Serve hot.

WW Freestyle Info.:  This recipe makes about 7 servings at a mere 3 points each.  Each serving is 10 ounces (weight) or about 2 cups.

Asian Beef & Broccoli

BeenNBroccoli_Logo

Posted by Erin

The only “vegetables” (even if you can call them that) I at as a child were potatoes and hominy.  Hominy… not sure that even qualifies as a vegetable, it’s so over-processed.  My mom tried everything to get me to eat my vegetables.  She tried making me sit at the table until I ate them… I was apparently a very strong willed child.  She tried seasoning them differently or “hiding” them in casseroles… I didn’t fall for that.   She even tried paying me.  That one actually worked… until she quit paying me, then I quit eating them.  My poor mom.  Fortunately, my taste buds have changed and now I’m a lover of all foods, meat and vegetables alike.  Luckily for me, my kids are a lot better eaters than I was as a child.  One of their favorite veggies is broccoli so we have it a lot.  We like it roasted, steamed & seasoned, covered in cheese, or incorporated into a dish such as this one.  This Asian Beef & Broccoli is a one-pan meal, which you know I love!  (Okay, two pans if you count the one you cook the rice in.)  It’s fast & easy to prepare and tastes like Chinese take-out!

Ingredients:

  • ½ c. beef broth (I use water & beef bouillion)
  • 3 T. cornstarch, divided
  • 2 T. sweet chili sauce (found in the Asian section of the grocery store)
  • 4 T. low sodium soy sauce
  • 1 T. garlic, minced
  • ½ tsp. fresh ginger or ginger paste
  • ¼ tsp. red pepper flakes (optional)
  • 1 T. sesame oil, divided
  • 1 (12 ounce) bag frozen broccoli florets, thawed and drained on paper towels (I chop them smaller so they spread more evenly throughout the dish & cook faster.)
  • ½ a medium onion, chopped
  • 1 lb. tenderized round steak (a.k.a. cube steak), trimmed and cut into small strips
  • 1 tsp. garlic powder
  • 1 tsp. onion powder
  • Salt & pepper
  • Cooked rice, for serving (We also like to have more soy sauce on hand to season our rice.)

Instructions:

In a small bowl, combine beef broth, sweet chili sauce, 1 tablespoon cornstarch, minced garlic, ginger, soy sauce, and red pepper flakes (if desired); set aside.

In a large skillet or wok, heat ½ tablespoon sesame oil over medium-high heat.  Sautee the broccoli, stirring frequently, until it gets some brown coloration on it.  Turn off heat, remove broccoli from the pan, and set aside.

In a bowl or plastic baggie, sprinkle steak strips with corn starch, garlic powder, onion powder, and a dash of salt & pepper; toss to coat.

Heat remaining ½ tablespoon sesame oil in the skillet again over medium high heat.

Add beef; cook and stir until brown and juice runs clear.

Add broth mixture & broccoli to pan with beef.

Reduce heat to low.

Simmer & stir about 5 minutes, until broccoli is tender and sauce is thickened.

Serve over rice; add more soy sauce, if desired.

WW Freestyle Info:  Each 8 ounce (weight) serving is 6 points; makes 4 servings.

Asian Lettuce Wraps

IMG_0416

When your favorite Asian restaurant is an hour from home, you learn to improvise – or at least I do.  I’ve learned to make my two favorites: Lettuce Wraps and Orange Chicken (I’ll share the chicken recipe with you later).  I’ve tweaked these Lettuce Wraps to my family’s liking by adding a little spice.  We had these for dinner tonight and they’re delicious – and at 6 SmartPoints per serving (for four servings) you can eat a lot! All you’ll need to do is remember to buy some fortune cookies. ~Tracy

Ingredients:

  • 1 pound 99% fat free ground turkey (I’ve also used very lean ground chicken)
  • 1 medium onion, chopped (about ¾ c.)
  • 2 oz. pine nuts
  • 2 T. minced garlic
  • 1 T. reduced-sodium soy sauce
  • ¼ c. hoisin sauce
  • 1 T. minced fresh ginger
  • 1 T. rice wine vinegar
  • 2 tsp. crushed red pepper flakes (more or less to taste)
  • 1 can (8 oz.) water chestnuts, drained and finely chopped
  • 1 bunch green onions, thinly sliced
  • 2 tsp. Asian sesame oil
  • 1 head lettuce or bunch of romaine lettuce

Instructions:

Rinse lettuce leaves, keeping them whole.  Set aside on paper towels to dry.

Cook turkey and onion together in large skillet.  Once turkey is approximately half cooked, add the garlic, soy sauce, hoisin sauce, ginger, vinegar, and crushed red pepper.  Continue cooking.

When meat mixture is fully cooked, add water chestnuts, pine nuts, and green onions.  Cook until green onions just begin to wilt.  Stir in sesame oil.

Spoon mixture into the middle of a large lettuce leaf.  Fold or wrap lettuce leaf around meat mixture to eat.

WW Info.: Makes 4 servings.

Freestyle SmartPoints:  5 SmartPoints per serving.

Old SmartPoints:  6 SmartPoints per serving.