Pizza Pot Pies

I very rarely sit down and watch a TV show.  About the only time I watch a show, in its entirety, is when I’m on the treadmill.  My favorite channel?  Food Network.  I am aware that it’s odd to watch cooking shows while exercising but I love them.  Not long ago, I watching a show where chefs recall their favorite dishes they’ve ever eaten.  This particular episode featured a restaurant that served pizza pot pies.  Ooey, gooey cheese, meat, and veggies, all covered with a warm crust… I knew I had to recreate it for myself.

These pizza pot pies are a fun variation on regular pizza.  There’s just something about getting your own little dish to yourself that you can turn upside down.  Seeing the melty cheese stretch as the filling piles high on top of the soft crust is about as much fun as dinner gets. YUMMY!  ͂ Erin

20180204_190904 (1)

Ingredients:

  • 1 c. self-rising flour
  • 1 c. non-fat plain Greek yogurt
  • ½ lb. mild turkey breakfast sausage, browned & drained
  • 1 medium bell peppers, diced
  • ½ medium onion, diced
  • 4 oz. baby portabella mushrooms, diced
  • 2 oz. turkey pepperoni, chopped
  • 2 oz. fully cooked Canadian bacon, chopped
  • 1 1/3 c. low-moisture part-skim mozzarella, divided
  • 2 cloves minced garlic
  • 1 (15 oz.) can tomato sauce
  • 1 tsp. garlic salt
  • 1 tsp. dried basil
  • ½ tsp. onion powder
  • ½ tsp. oregano
  • ½ tsp. paprika
  • ¼ tsp. black pepper
  • 1 tsp. sugar
  • Non-stick cooking spray
  • 1 egg, beaten
  • Italian seasoning, optional

Instructions:

  1. To make the crust, mix the Greek yogurt and the self-rising flour in the bowl of your stand mixer for a couple minutes on low until well mixed.  I used my paddle attachment.  You can also mix it by hand.  Turn the dough out on a lightly floured surface (flour your hands too) and knead it a few times.  Set aside while you prepare the filling.
  2. Preheat the oven to 400°F.
  3. Spray 4 6-ounce ramekins inside and out and place them on a sheet pan.  (If you don’t have ramekins, see note below.)  Fill each ramekin with 1/3 cup mozzarella cheese.  Set aside.
  4. Spray a large non-stick skillet with cooking spray; sauté veggies over medium heat until crisp-tender.
  5. Add cooked sausage, chopped pepperoni, chopped Canadian bacon, minced garlic, tomato sauce, garlic salt, basil, onion powder, oregano, paprika, black pepper, and sugar.  Simmer on low about 5 minutes.
  6. Disperse meat filling evenly on top of cheese in the ramekins.
  7. Divide dough into 4 equal pieces and pat into discs.
  8. Top each ramekin with a piece of dough, stretching over the sides a bit.
  9. Brush the dough with egg and sprinkle with Italian seasoning, if desired.
  10. Bake for 20 minutes, or until golden brown.
  11. Using an oven mitt, turn out on your plate for serving. Careful, it might be slippery!

*This can easily be made in an 8×8 casserole dish, layered in opposite order:  crust on the bottom, filling, then cheese on top.

WW Freestyle Info.: Each serving (one full ramekin) is 10 points.  Makes 4 servings.  Without the dough, each serving is 7 points.  I wanted you to have this information in case you want to substitute a pre-packaged refrigerated pizza dough.  I understand that sometimes we don’t all have time to mix up our own pizza dough!


Pizza Dip

Any time I make this dish, I get numerous requests for the recipe.  It is a true crowd pleaser. What could be better? Pizza, but in a dip! Make this and please the folks at your next get together.  ~Kathy

pizza_dip_panlogo

Ingredients: 

8 oz. cream cheese, softened

1 clove garlic, finely minced

1 tsp. Italian seasoning

¼ tsp. onion powder

12 – 15 pepperonis, chopped

½ c. pizza sauce

1 c. shredded mozzarella cheese

2 T. sliced black olives

1 green onion, sliced

Instructions:

Combine first four ingredients in a small bowl. Spread into a small baking dish. Top with chopped pepperonis, pizza sauce, cheese and black olives.

Bake at 350˚F for 15-20 minutes, until heated through and bubbly around the edges. Top with green onions.

Serve with garlic bagel crisps or garlic parmesan pretzel crisps.

pizza_dip_plating

Italian Stuffed Shells

This recipe is a hit at our house.  My husband says it’s better than lasagna (one of our favorites)! These are great for dinner at home or would be a crowd pleaser at a pot luck.  Truly, Italian comfort food.  With simple ingredients, you can crank out an impressive dinner for your family. Serve alongside a green salad, and ta-da, dinner is complete!  The mix of cheese….  Come to Mama!   ~Kathy

shell_scoop_logo

Ingredients:              

  • 12 oz. Jumbo pasta shells (make plenty – some will break; you need about 34 for this recipe)
  • ½ lb. 96% lean ground beef
  • 1/3 c. chopped onion
  • 1 c. shredded parmesan cheese (not the powdered type)
  • 1 c. (1% fat) cottage cheese
  • 1 (7.5 oz.) package cream cheese with chive and onion
  • 2 c. low moisture part-skim mozzarella, shredded (reserve ¾ c.)
  • 3 eggs, lightly beaten
  • 2 cloves garlic, minced (or 1 tsp. garlic powder)
  • ¼ tsp Italian seasoning
  • 1 tsp pepper
  • 2 tsp dried parsley
  • 1 (24 oz.) jar reduced fat spaghetti sauce
  • 3 T. water
  • Optional garnishes:  fresh chopped basil or parsley

Instructions:

In large pot, bring salted water to a boil.   Cook pasta just until al dente (about 10 minutes).  Drain, rinse in cold water and turn open side down on paper towels to dry.

While the noodles are cooking, cook ground beef with onion.  Season with salt and pepper.   Drain grease and set aside.

Combine parmesan cheese, cottage cheese, cream cheese and 1¼ c. mozzarella.   Stir in eggs, garlic, Italian seasoning, pepper and parsley.  Stir in ground beef mixture.  Combine well.

In a small bowl, mix together water and ¼ c. spaghetti sauce.   Spread into the bottom of a greased 9×13 pan.

Fill each shell with a heaping tablespoon of cheese mixture.  Set into pan open side up.  Continue filling shells until cheese mixture is gone.   Top with remaining sauce.

Cover loosely with foil and bake in a preheated 375˚ oven for 40 minutes.   Turn oven off, remove foil.  Top with remaining mozzarella cheese.  Leave in oven for an additional 5 minutes.   Remove from oven and allow to sit for 5 minutes before serving.

Top with fresh chopped parsley or basil if desired.

WW Freestyle Info.:  This makes approximately 34 stuffed shells.  A serving of 2 shells is 7 points.  A serving of 3 shells is 11 points.


Real Deal Macaroni and Cheese

macncheeselogo

Growing up, macaroni and cheese was oftentimes made from a box.  Our Mom, who is a fabulous cook herself, had four daughters within eight years (can we have a moment of silence thanking the Lord that she maintained her sanity?).  So let’s face it….there had to be some shortcuts made somewhere.  Now that the processed food fad of the 70s and 80s has faded, homemade macaroni and cheese is all the rage.  I mean, you can get it on your burger in some restaurants.  If you are a connoisseur of amazing cheesiness as we are, and ready to take steps away from the box  (oh, please do), this is the recipe you need to try! ~ Tracy

Ingredients:

  • 3 c. uncooked elbow macaroni
  • 6 T. butter
  • 6 T. all-purpose flour
  • 3 c. milk
  • 1 ½ t. salt
  • 1 ½ t. sugar
  • 1 lb. cubed Velveeta
  • 2/3 c. sour cream
  • 1 1/3 c. cottage cheese
  • 2 ½ c. shredded cheddar cheese
  • 1 ½ c. shredded Swiss cheese (you can tear up slices if you can’t find shredded Swiss)
  • 15 Ritz Crackers
  • ¼ stick butter, melted

Instructions: 

Cook & drain macaroni according to package directions.

In a medium sauce pan, melt butter over medium heat.  When butter is melted, stir in flour and mix well (the mixture will form a buttery paste).  Add milk and cook until the mixture begins to thicken.  Add salt, sugar, and cubed Velveeta.  Stir until Velveeta is melted.  Remove from heat and immediately add sour cream and cottage cheese, stirring well until blended.

In a large bowl, combine cooked macaroni noodles, cheddar cheese, and Swiss cheese.  Pour the hot creamy mixture over the macaroni and stir well until cheeses are melted and combined.

Pour the entire mixture into a greased 9 x 13 casserole dish.

Crush Ritz crackers and pour into a bowl.  Combine crushed crackers with melted butter and stir to coat well.  Sprinkle the crackers over the macaroni.

Bake at 340 for 45 – 50 minutes.  If crackers begin to become too brown, cover the top with a loose piece of aluminum foil and finish baking.

Philly Cheesesteak Stuffed Peppers

PhillyCSPeppersLogo

I love stuffed peppers. Stuffing anything in a pepper just automatically makes it better. These Philly Cheesesteak Stuffed Peppers are easy, cheesy, and meaty. They are best grilled but great out of the oven too.

͂ Erin

Ingredients:

  • 6 oz. fresh, sliced mushrooms
  • 8 oz. thinly sliced roast beef, chopped into small pieces
  • 8 oz. (8 slices) provolone
  • 1 medium onion, diced
  • 2-4 cloves garlic, minced
  • 1 T. olive oil
  • 2 large bell peppers
  • 1 T. Worcestershire sauce
  • 1/2 T. steak seasoning

Instructions:

Cut the peppers in half from top to bottom; remove seeds and veins and place pepper halves in a pan. Set aside.

Heat the oil in a skillet over medium heat.  Cook onions, garlic, and mushrooms until onions are translucent and mushrooms are tender. Add roast beef, Worcestershire, and steak seasoning; cook until heated through. Remove from heat and set aside.

Heat the outdoor grill to medium heat or the oven to 400°F.  Line each pepper half with a slice of cheese.  Stuff the peppers with filling and top with another slice of cheese.  If cooking on the grill, place the peppers directly on the rack and cook until the peppers are tender and cheese is melted.  If cooking in the oven, place the pan of peppers on the lower rack and cook about 30 minutes or until peppers are tender and cheese is melted.

WW Freestyle Info.: Each stuffed pepper half is 10 points.  This recipe makes 4 servings.

Italian Tortellini Salad

I invented this on a Sunday night when I felt like something new. I love the Italian chopped salad at McAlister’s Deli, so I was thinking about that as I started, but I like how it ended up even better if I do say so myself. Its distinctive flavors still go together well. It makes a HUGE amount, so I quickly realized I’d need to share and took most of it to work the next day. I was pleased to find I didn’t even have to try to find a spot in the fridge for it again when I went to put it away at the end of lunchtime since it had all vanished – yay!

ChopItalPasta_Logo 

The best part about this recipe, as I face down a 99 degree afternoon, is that it requires no cooking except quickly boiling the tortellini, and it’s served at a nice chilly temp.  This is filling enough to be your dinner or a hearty side or appetizer.  ~Robin 

Ingredients:

  • Buitoni three-cheese tortellini, 1 20 oz. bag
  • 2 medium cucumbers, chopped
  • ½ red onion, diced or thinly sliced (about a cup, sliced)
  • 2 c. of tiny tomatoes, halved or quartered depending on size (I love Sunset’s Wild Wonders Gourmet Medley for their variety of colors, but you can snag any grape or cherry tomato variety as well)  
  • 1 c. sliced Kalamata olives (could use green olives too, but I love Kalamata olives)
  • About 4 c. of baby spinach (stems removed)
  • 2 c. hard salami, cubed into ½ in. chunks (about 10 oz. by weight)*
  • 2 c. provolone cheese, cubed into ½ in. chunks (about 10 oz. by weight)
  • 1 c. Ott’s creamy Italian dressing
  • Black pepper, fresh cracked, to taste (optional)

Instructions:

Prepare one package of tortellini according to package instructions, except do not add any olive oil – it would make it harder for the dressing to stick to the pasta later.  Drain very well and set aside to dry further and cool.  

Once pasta is cool enough and well-drained, add all other ingredients except tomatoes, black pepper, dressing, and olives; then mix. Add tomatoes, olives, pepper (if desired), and dressing, gently tossing until mixed well and salad is coated with dressing throughout. Chill & serve.  

*My deli counter sliced the salami and cheese into ½ inch thick slices so I was able to simply chop it into cubes from there…big time saver!  This salami from the deli is SO much better than the lunch meat slices you may have been tortured with by a well-meaning relative as a child. I thought I didn’t like salami all my life, but it turned out I just hadn’t had the right salami.  Give salami a chance! Unless you’re one of our vegetarian friends, in which case you can save a couple bucks instead.  🙂 

Broccoli Salad

BroccoliSalad_closer

Posted by Robin

Our aunt Kathleen never failed to bring this anytime we were having a salad supper at Grandma’s house, and we never failed to devour it. Even as small children. And the main ingredient is broccoli.  Enough said. 🙂

Salad Ingredients:

  • 4 slices of bacon, crumbled into very small pieces (homemade bacon bits)
  • 4 cups of small florets of broccoli (fresh – about 2 sm. heads)
  • 3/4 c. sharp cheddar, shredded (don’t get the finely shredded cheese, as pieces won’t be substantive enough to taste well in the mix)*
  • ¼- ½ large red onion, diced (depending on preference – I do ½ c.)

Dressing Ingredients:

  • 1/2 c. Miracle Whip*
  • 1 1/2 T. sugar
  • 2 T. white vinegar 
  • A dash of salt

*For the WW version if this recipe, use Miracle Whip Light and low fat cheddar. All other ingredients and quantities are the same.

Instructions: 

Cook bacon until nice and crispy; drain, cool, and crumble.

In a large bowl, combine broccoli florets, cheddar, red onion, and bacon. Set aside.

To make dressing, in a small bowl, whisk together Miracle whip, sugar, vinegar, and salt until sugar is dissolved well, and it’s evenly combined.

Pour dressing over salad and gently toss to coat salad evenly.

WW Freestyle Info.: Makes about 1 pound of salad – about 10 half-cup servings, 2 points per serving.

Monterey Chicken

ChickenMontereyLogo

Posted by Erin

This recipe is an oldie but a goodie… a classic in many restaurants and diners, Monterey Chicken is always a favorite.  It’s so easy to make, there’s no reason you shouldn’t enjoy it at home as well!  This is one of the first dishes I made when Albert and I were newlyweds… or at least one of the first successful dishes.  It’s still on the menu at our house quite often, 14 years later.  It’s a quick and easy meal for a busy night, especially if you have the bacon precooked.  I keep cooked bacon in my freezer all the time (We love bacon!) but, if you don’t have any on hand, you can easily substitute 1 T. pre-packaged real bacon bits per chicken breast.  Enjoy!

Ingredients:

  • 6 (approx. 4 ounce each) boneless skinless chicken breast, pounded 1-inch thick
  • 1 tsp. each of cumin, garlic salt, onion powder, and smoked paprika
  • 1 T. olive oil
  • 6 T. barbecue sauce
  • 6 thin slices Colby-Jack cheese (such as Sargento Ultra Thin)
  • 6 slices center cut bacon, cooked crisp & crumbled
  • 1 medium tomato, seeded and chopped
  • 1 green onion, chopped

20170327_224135

Instructions:

Preheat oven to 350° F.

Heat the olive oil over medium high heat in a large oven-safe skillet.

Season chicken breasts with cumin, garlic salt, onion powder, and paprika.

Brown the chicken in the skillet for 3 or 4 minutes on each side until no longer pink; remove from heat.

Top each chicken breast with 1 T. barbecue sauce, 1 slice cheese, and 1 slice crumbled bacon.

Sprinkle evenly with chopped tomatoes and green onions.

Transfer the skillet to the preheated oven and bake about 5-8 minutes, until cheese is fully melted.

WW Info.:  6 servings (Each loaded chicken breast is one serving.)

Freestyle points: 5

Old points:  6

Greek Quesadillas

  Posted by Robin 

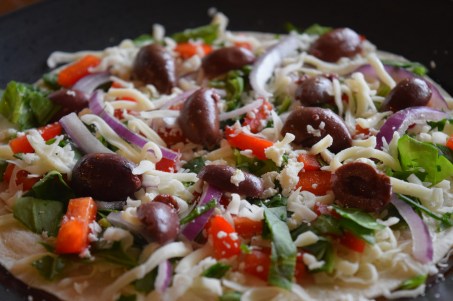
GreekQuesadillas_wLogo

I make these as a (very filling) vegetarian dish, but if you want to throw in some shredded rotisserie chicken, you could. My husband Barry usually complains about all-veggie meals because he doesn’t feel like they are filling, but he loves this one – and stays good and full. It’s one of our daughter Emery’s favorites too!  These are so rich tasting and super easy, but I also love how absolutely gorgeous they are. We all deserve a pretty meal now and then!  

Ingredients: 

8 8-inch tortillas*

2 c. shredded mozzarella*

1 red onion, thinly sliced

2 c. fresh spinach

1/2 c. feta cheese, crumbled*

1 red bell pepper, chopped** 

12 Kalamata olives, pitted & sliced (I usually buy them sliced and count 2 or 3 slices as one olive depending on size)

Cooking spray

*Weight Watchers-friendly ingredient substitutes:  

8 8-inch Ole Extreme Wellness High Fiber low carb tortillas wraps

2 c. shredded part-skim mozzarella

½ c. fat-free feta (Nikkos is my brand)

**You can do sun-dried tomatoes instead of red bell peppers; I don’t think they go as well together so I recommend either/or – the bell pepper is definitely the healthier option and is my preference – the sun-dried tomato can be too dominant a flavor for me, but Barry loves them.

DSC_0861

Directions:

Spray non-stick pan with cooking spray; begin heating to medium heat.  Place a tortilla on a plate and build, using about a half cup of mozzarella per quesadilla (it’s the glue that will hold it all together).  Pile on what you’d like (for Weight Watchers, no more than 9 slices of olives – about 3 olives); place carefully in the pan and top with another tortilla. Brown on both sides; cut and serve.

Weight Watchers Info.:  For a whole 8-in. quesadilla, this is just 8 SmartPoints (serves 4).

Cheesepic

Chicken South of the Border

DSC_0913

Posted by Robin

If I’m pressed to name my favorite entrée (let’s be real; my favorite food is a tie between several kinds of dessert), this has to be it.  I think it’s beg-for-it-for-your-birthday level good — and I’m pretty sure I did just that a few times as a kid.

This is a very Tex-Mex kind of dish.  But what could be better for Cinco de Mayo, the holiday mooostly celebrated in the US?

Speaking of celebrating, this dish does pair quite nicely with a margarita on the rocks. I may have to cook this favorite myself now (most of the time), but being a grown up does have some perks!

Before we get into the recipe, there’s something you have to know.  Cheese whiz is part of this recipe.  Before you run screaming for the hills, just hear me out.  I know it’s not usually the most appealing ingredient, but I promise it’s perfect for this dish.  You could use Velveeta, but I tell you it’s just not the same (I’ve tried it and was disappointed).  Also, you’ll have such great 80s memories flash back — Fastback tennis shoes (somebody out there remembers those; don’t try to deny it), plus jellies shoes, mix tapes, and leg warmers, oh my!

Ingredients for Cornmeal Fried Chicken:

  • 4 chicken cutlets, pounded flat
  • 1 c. flour
  • 1 tsp. garlic powder
  • 1 tsp. cumin
  • ½ tsp. cayenne pepper
  • 1 tsp. salt
  • 6 beaten eggs
  • 1 to 1 ½ c. cornmeal

Ingredients for Salsa:

  • 2 c. diced canned tomatoes, drained (which will probably be about 1.5 cans once drained)
  • 1 small white onion, diced
  • 1 green bell pepper, diced
  • 2 cloves garlic, minced
  • 1 T. lime juice
  • 1-3 jalapeños, diced (depending on heat pref. – I use 3)
  • ½ tsp. salt
  • ¼ tsp. garlic salt
  • ¼ c. cilantro, chopped (optional—I love cilantro)

Other Ingredients:  

  • 1 15 oz. jar of cheese whiz
  • Vegetable oil, for frying

Instructions:

For salsa, in a medium bowl, start with diced canned tomatoes, drained. Add onion, green pepper, garlic, jalapeños, lime juice, salt, garlic salt, and cilantro (if desired).  Refrigerate.

Combine flour and seasoning in a medium (cereal bowl size is fine for these) bowl.  In a medium sized separate bowl, beat eggs slightly.  In a separate medium sized bowl, place cornmeal.  Set aside.

Trim any fat from chicken.  Place vegetable oil, about a half inch deep, in a deep frying pan on medium heat.

To coat each piece of chicken to prepare for cooking, dredge through flour mixture, egg, flour mix again, egg again, then cornmeal.  Gently place directly into hot oil.  Cook a few minutes on each side — until cooked through and cornmeal is a nice golden color.  Try not to turn it too often, as you don’t want to knock off that delicious batter. (Chicken should reach 165 degrees in center.)

As you cook chicken, set aside on a plate lined with paper towels to drain any excess oil.

Microwave a few servings of cheese whiz in a bowl, heating to liquid for 20 seconds at a time, then stirring each time.  (Do not look directly at the cheese whiz at this stage until it’s fully melted if you can avoid it.  Not pretty as a solid, but it will be good on your chicken once it’s melted. Really.) 🙂

To serve, plate chicken.  Spoon the piping hot cheese whiz over chicken.  Top with salsa.  Enjoy the magic.  And maybe a margarita.